
The slightest dust or static electricity can considerably affect the sound quality of a turntable, which justifies that one should clean and maintain the turntable regularly. Cleaning the discs can benefit you, but you need to adopt a few techniques. Cleaning kits, stylus cleaners, or carbon fiber brushes are some of the possible solutions.
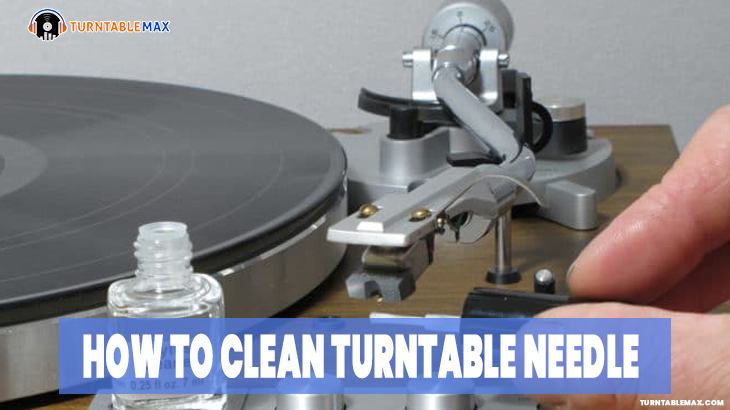
So how to clean a turntable needle? Here is our guide on removing the dust and grimes that keep your vinyl collection spinning. This article will give you some ideas on how to clean the turntable needle and prevent premature wear of this essential element of your listening system.
WHERE DOES DUST COLLECT ON A TURNTABLE?
A record player consists of a base and three main parts, each of which can collect dust in corners. Dust negatively impacts the listening experience, causing skipping of tempo issues. In the worst case, dirty vinyl can even crack!
Watch out for dust build-up in the following parts of your record player:
The Turntable: The turntable is the circular area where the records are placed, and it’s practically a magnet for dust bunnies. Usually, the turntable is flat, but versions with engraved or painted designs may collect additional and hidden dust.
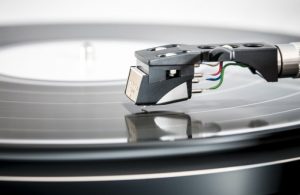
The stylus: Also called the needle, the stylus is the part of the record player that slides back and forth over the grooves of a vinyl record, translating these grooves into sound. If sufficient dust accumulates, the needle may bend, resulting in noise or severe scratching.
The Tonearm (and Arm Lifter): The long “arm” rests on the vinyl. It holds the stylus and cartridge in place. The cartridge uses built-in magnetic coils to absorb vibrations through a piece of metal called the cantilever.
There were many vocabulary words there, but basically, the tonearm works with the cartridge to translate the stylus signals into the final sounds you hear through your speakers. If dust collects in any part of the tonearm, it can obstruct the movement of those parts and interfere with those good vibrations. When this happens, the sound quality suffers.
WHY IS IT NECESSARY TO CLEAN THE STYLUS NEEDLE?
It is expected that many people continue to take care of the records as they are a valuable resource. But it is pretty important to take advantage of the fact that cleaning the stylus is mandatory, just like cleaning every part of the turntable. Here we will tell you the importance of keeping the stylus needle clean and different ways to clean it.
So why is it necessary to clean the stylus needle? What will happen if you don’t clean it? If you have such questions on your mind, then here is the answer,
If you don’t clean the stylus between every play, any contaminant dust particles will get settled on the record’s grooves and can affect your listening experience.
Besides, if you don’t clean the records, the stylus tip can pick up the dust particles and other contaminants from the record. When the stylus is dragged through the groove, it melts the vinyl instantly and then hardens it, diminishing the sound quality and possibly damaging the stylus.
This is the reason why you should make sure that the stylus is perfectly clean before you play every record.
HOW TO CLEAN A TURNTABLE NEEDLE?
Cleaning the stylus needle is very simple. There are various products available on the market that can be used to clean the Stylus needles. Here are some commonly used tools to clean records and stylus.
- Using Magic Eraser
- Using Stylus Brush
- Using Cleaning Solution
- Zero Dust
1. USING A MAGIC ERASER
If you still have no clue about what this is, let me explain. Mr. Clean’s magic eraser is actually a sponge scrubber that is often used to clean splotches or other dirt from certain surfaces. It is well known for its efficient cleaning power and can be used for different applications. The different application also includes cleaning the turntable needle. Follow the below steps to clean the turntable needle using magic rubber.

- Cut a small piece of the magic eraser.
- Place it on the turntable.
- Move the Tone Arm over the magic eraser.
- Now lower the tonearm and allow the stylus needle to sink into the magic eraser.
- Then raise the tonearm.
- Repeat the process. Lowering the tonearm into the magic eraser 3 or more times will give your stylus needle a high-level cleaning precision.
This is the most inexpensive way to clean your stylus needle. Regular cleaning will keep your stylus in optimum condition and prolong its lifespan.
2. USING STYLUS BRUSH
This is one of the common and well-known methods to clean a turntable needle. The Stylus Brush is a product that is often sold along with the turntable or sold by the cartridge manufacturers when you upgrade the cartridge. Or you can get a separate stylus/needle brush. Some manufacturers also sell them along with a cleaning liquid. For the safer side, we tell you how to use only the brush.
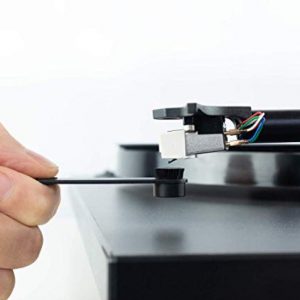
Steps to clean the stylus needle using a brush,
- Get a stylus brush.
- Keep the brush in the direction of the stylus needle or in the direction that a record spins. If you can handle the turntable well, you can also remove the cartridge and clean it.
- All you need to do is brush the needle from either back to front or from front to back.
- Repeat the process until you the needle is clean.
Not all the stylus needles go with an ordinary brush, and some might need a dedicated brush with a cleaning solution. So it is always better to follow the manual given with the cartridge to avoid any confusion or damage to the needle.
3. USING CLEANING SOLUTION
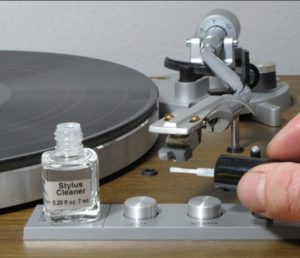
This method is used to remove the stubborn grime. The stylus cleaner solution is usually an alcohol or ethanol-based solution that can break apart the hard dirt bonded onto the diamond tip. Comparatively, it is very easy to use.
All Phono cartridges are not the same. MM and MC cartridges differ in construction, the material used in the cantilever, and the needle diamond quality used in the stylus. Most of the High-end cartridges are hand-assembled and offer high-quality sound, which figures its price and popularity.
Use it carefully as it can cause damage to the surface of the turntable or the vinyl records. Removing the headshell can make it easier to see and clean the stylus tip. But it is recommended only you are confident enough to do that.

Steps to clean stylus needle using a stylus cleaning solution.
- The cleaner is more like nail polish or more like lens cleaning solution in a small bottle.
- They even have a small brush attached to their cap.
- Open the cleaner bottle and wipe the brush against the bottle’s edge to remove the excess fluid.
- Now gently rub it against the stylus tip to remove dirt and grime.
- Brush the stylus tip from the rear to front movement. Note: Do not brush from side to side as it can damage the cantilever arm.
- Repeat it a few times to ensure that the stylus tip is clean. Don’t overuse it, or else it might damage the stylus tip.
4. USING ZERO DUST
Zero dust is a tacky gel-based cleaner that is ideally suited for daily stylus maintenance. This stylus cleaner is a specially formulated polyurethane gel that gently removes the dirt particles from the stylus tip.
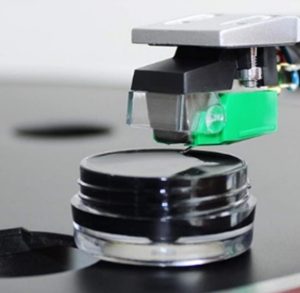
Steps to clean stylus needle using Zero Dust,
- Remove the lid and place the cleaner on the turntable platter.
- Carefully raise the headshell and position it over the gel cleanser.
- Gently lower the tonearm until the tip touches the cleaner gel.
- Repeat the process until you feel the stylus tip is clean.
- Don’t force the stylus into the gel or leave it into the gel for an extended time. Just make sure you make a gentle dip. The stylus tip needs only to make a quick momentary contact for proper cleaning.
HOW OFTEN SHOULD I CLEAN MY RECORD PLAYER?
You should wipe down your record player after each use and thoroughly clean it at least once a month. If you properly store your vinyl using a record player cabinet and keep your collection clean, you will find that your sound quality is better and your records last much longer.
With these tips, you’ll get premium sound, dust-free listening, and a vinyl collection to give you a hard time. Pay attention to your wallet the next time you visit a thrift store. Now that you’re a collector, those dollar records can be dangerous!
CONCLUSION
We have provided you with all the possible and easy ways to clean and maintain your turntable needles. The durability of a turntable depends on the maintenance you do with it. It’s just going to take a few minutes to clean the turntable needle. If daily cleaning is not your thing, we highly recommend you refresh the turntable needle at least once a week. The more you treat your stylus with care, the longer it will last.