
When using turntables, there is one unavoidable thing that is usually constant pain in the neck. It is the needle or the stylus, as many people would like to call it. While most parts of the turntable are pretty durable, the longevity of the needle will vary depending on how much care you give it and the extent of its use.
The movement of the Diamond in the groove moves the cantilever and generates the signal you hear. This movement is made thanks to the contact between the Diamond and the disc. It is this contact that causes the Diamond to wear.
At some point, you will probably notice a difference in the sound quality, and when such symptoms start to show up, it is time to replace the turntable needle. Best of all, you won’t have to hire a professional for this. Even if you are a beginner, with this step-by-step guide, you should be able to change the needle without much hassle.
HOW TO AVOID WEARING OUT YOUR DIAMOND
PROPER INSTALLATION:
If the alignment of your Diamond is not correct, your Diamond will wear prematurely: like the tires of your car, if the parallelism of your wheels is not perfect. It is, therefore, necessary to correctly adjust your turntable. Otherwise, the wear of the Diamond will be more on one side than the other, and the stereo balance will be degraded.
The main thing to remember is that if the cell/diamond pair is not aligned in the groove, if the counterweight is too heavy, or if the anti-skating is too strong, your Diamond will wear out faster than it does. So be sure to respect the weight indicated by the manufacturer for your Diamond and adjust your anti-skating.
KEEP THE TURNTABLE CLEAN
Each dust not only attenuates the quality of your listening but comes to wear down your Diamond. It is therefore essential to listen to clean records. We advise you to clean the records with a suitable vinyl cleaning machine or at least with a microfiber cloth intended for this use and soaked in a solution intended for this purpose.
Before listening, it is essential to use an anti-stat brush. Then, after listening, put your records back in their sleeve immediately.
HOW DO YOU KNOW WHEN TO CHANGE THE DIAMOND
The lifespan of a diamond is very variable. Some brands like Nagaoka have a very short lifespan, between 150 and 200 hours (sic!). Others can climb for around 1000 hours without flinching.
How long do you listen to your records each day? 1 hour, 2 hours, 3 hours? Sometimes a lot more and when you go on vacation in the summer and a lot less. Take an average, refer to the recommendations of the manufacturer of your Diamond, and you will have an idea of its lifespan.
An intensive user will have to change diamonds once a year, others between 2 and 3 years. But most importantly, trust your ears. You inevitably know certain albums, certain songs from your disco better than others. So these records or the songs will be your “yardsticks.”
Put yourself in favorable listening conditions. Does the flicker are less than before, and the bass is not well defined? Does the rerecord sound dull? Did you notice unbalanced stereo? Then it’s time, and you have to face the inevitable, yes! Your Diamond needs to be changed.
Don’t obsess over the wear and tear on your Diamond. Its aging is inevitable. take care of your records, take pleasure in listening, and when it is time to change it, you will know when to change your Diamond.
HOW TO REPLACE NEEDLE ON OLD RECORD PLAYER
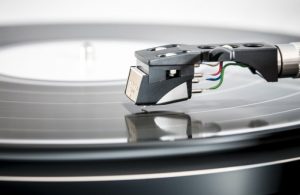
STEP 1: CHECK THE CARTRIDGE
The first thing you need to do is locate the position of the tonearm, which is usually the part that holds the stylus and cartridge in place. Once you have identified it, you need to check whether it is interchangeable or not. An interchangeable HiFi cartridge will make the task much easier.
STEP 2: CHECK THE NEW CARTRIDGE MODEL
Before proceeding any further, make sure you have a screwdriver, a stylus dynamometer, tweezers, and needlepoint pliers. Once you have it, you can continue. Keep in mind that if you are doing this for the first time, you are strongly advised to change the cartridge as well; otherwise, we will continue to focus on replacing the needle.
In this step, you also want to ensure that you have the exact model of the needle cartridge your old record player had. Ensure the information is very accurate as it is the same information that you will use to obtain the replacement part for an electronic device or if you prefer to order online.
STEP 3: REMOVE THE CARTRIDGE SHELL
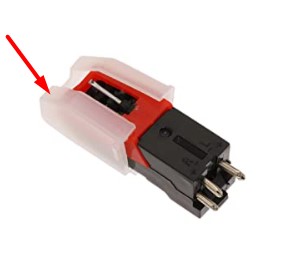
If the tonearm shell is removable, first gently unscrew it from its position. , And once that has been done, you can now pull the stylus in the opposite direction of the head. This will allow you to separate the needle from all other parts of the turntable.
If your record player does not have the detachable tonearm, all you need to do is remove the cartridge with the needle. Of course, this should be done in the opposite direction to that of the tonearm.
STEP 4: REMOVE THE NEEDLE
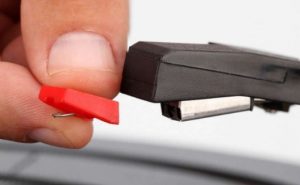
Here let’s assume the cartridge is removable. In this case, you will only be replacing the needle; grasp it between your index finger and thumb and pull it out. If you find it difficult, you can use the needle clamp to remove the needle.
Most of the turntables have needles attached to their headshell. In such a case, replacing the headshell with a needle is recommended. In some cartridges, you need to replace only the needle.
We recommended you get the exact model of the cartridge/ needle your turntable had unless you trying to do any upgrade to your turntable.
STEP 5: REPLACE THE OLD NEEDLE WITH A NEW NEEDLE
Unpack the replacement needle, and be sure to read the instructions that came with it. If there are no instructions, don’t worry; just hold the needle head and push it very gently into place. It should snap. If you would like to change the cartridge, this usually comes with a clear set of instructions. The tools mentioned above will be useful for this purpose.
When removing the needle, be careful not to remove the threads or strip them. To do this, you will need to go to a specialist, but if they slip, you can push them back using the tweezers.
Ensure your hands are clean and oil-free when handling the needle or stylus not to compromise the quality of sound it can deliver.
STEP 6: PUT THE HEAD SHELLBACK
Once you’re done replacing the needle, the next challenge is to put everything back in place. If you have detached the cover, you need to make sure that you have put it back in place correctly.
STEP 7: ALIGN THE TONEARM AND STYLUS
Now align the needle. Depending on the model of the turntable, you can either use the cantilever gauge to do this or, if not, use the paper protractor.
It’s not a tedious process, and doing it about three times will make you a professional. Remember to make sure you get as little contact as possible with the needle itself, especially with the replacement option.
CONCLUSION
We have given you some ideas on when to change your Diamond and how to replace the needle on an old records player. But remember that it is important to prevent premature wear of this essential element of your listening system.
If you are new to the turntable, read the user manual to locate the components correctly and know how to handle them. If you feel it difficult to go through all the process, you can take it to a professional or the nearby turntable shop, and it will cost you some dollars.